
Over the last few months, I’ve hopefully opened your eyes to some of the neat tricks you can use to help publish your book using the Microsoft Office suite. Microsoft Word is an obvious choice for writing, and Microsoft Excel can also be useful to manage lists and other planning information, but did you know there’s one more program that can help you publish your book as well?
Up until now, the programs I’ve suggested are ones that you’d likely use anyway if you were trying to organize your work or polish your manuscript. The key was merely using the lesser-known tools within these programs to make your life as a writer easier. This month, I’d like to suggest something that might shock you and will require you to use a program in a slightly different manner than it’s usually used. That program is:
MICROSOFT POWERPOINT
Most people associate PowerPoint with corporations, presentations, and goofy animations. While these are the typical uses for the program, it wasn’t until recently that I realized I could use PowerPoint as part of my publishing process. Some programs like Scrivener and Adobe Photoshop might have some useful tools as part of their suite of functions that can help authors with their projects, but these programs are a bit more expensive and less universally available than Microsoft PowerPoint. By this point, you might be asking, “How do I use PowerPoint to publish a book?” Well, there are three ways it can help . . .
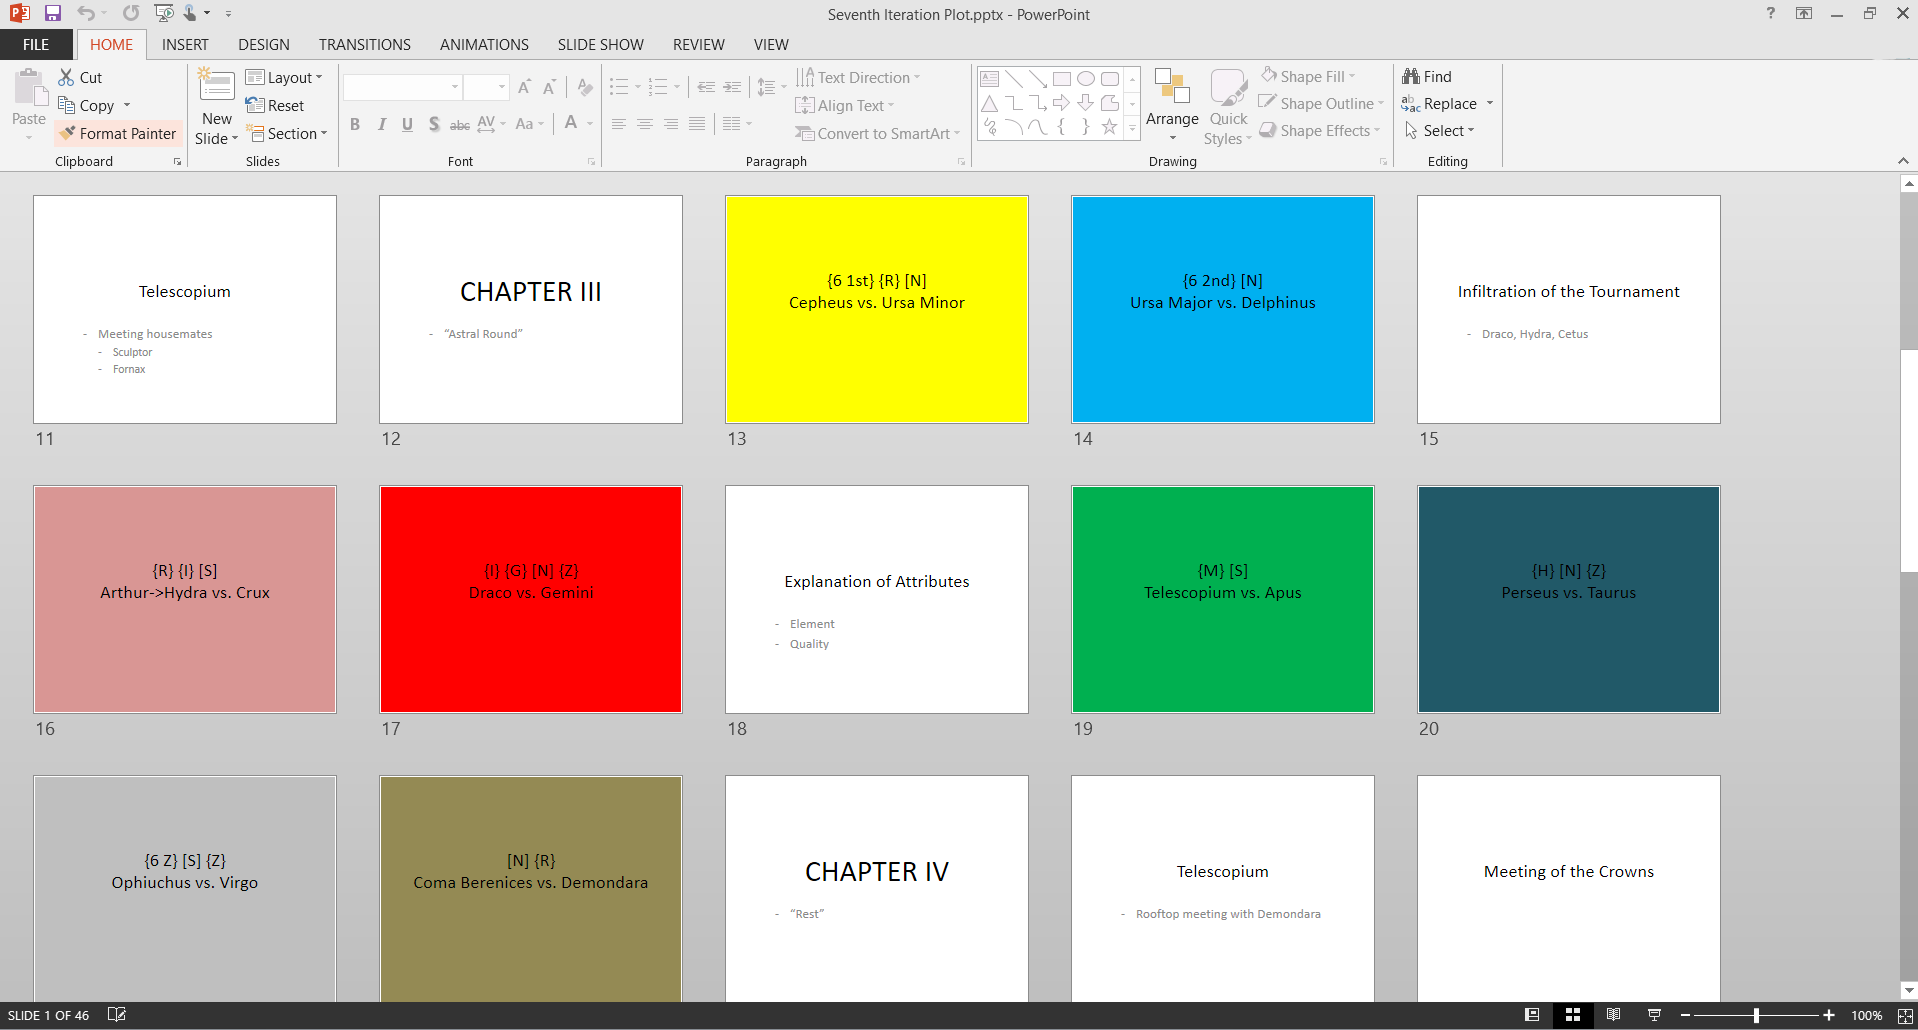
- Scene organization: How often have you seen a poster board full of index cards or post-it notes where an author is planning out what happens in their story? Each of the critical scenes in a book can potentially be re-arranged, especially if there are multiple sub-plots involving different characters. If you color the backgrounds of some of your PowerPoint slides and use the “Slide Sorter” option at the bottom of the window, you can easily see at a glance where all your scenes are in relation to each other. With big enough fonts, you can also read these “index cards” so you know what the main thrust of each scene is. While Scrivener has a much more advanced “index card” system, PowerPoint can sufficiently provide a way to organize the scenes in your book so that you can plan out the flow of the plot before you even start writing.
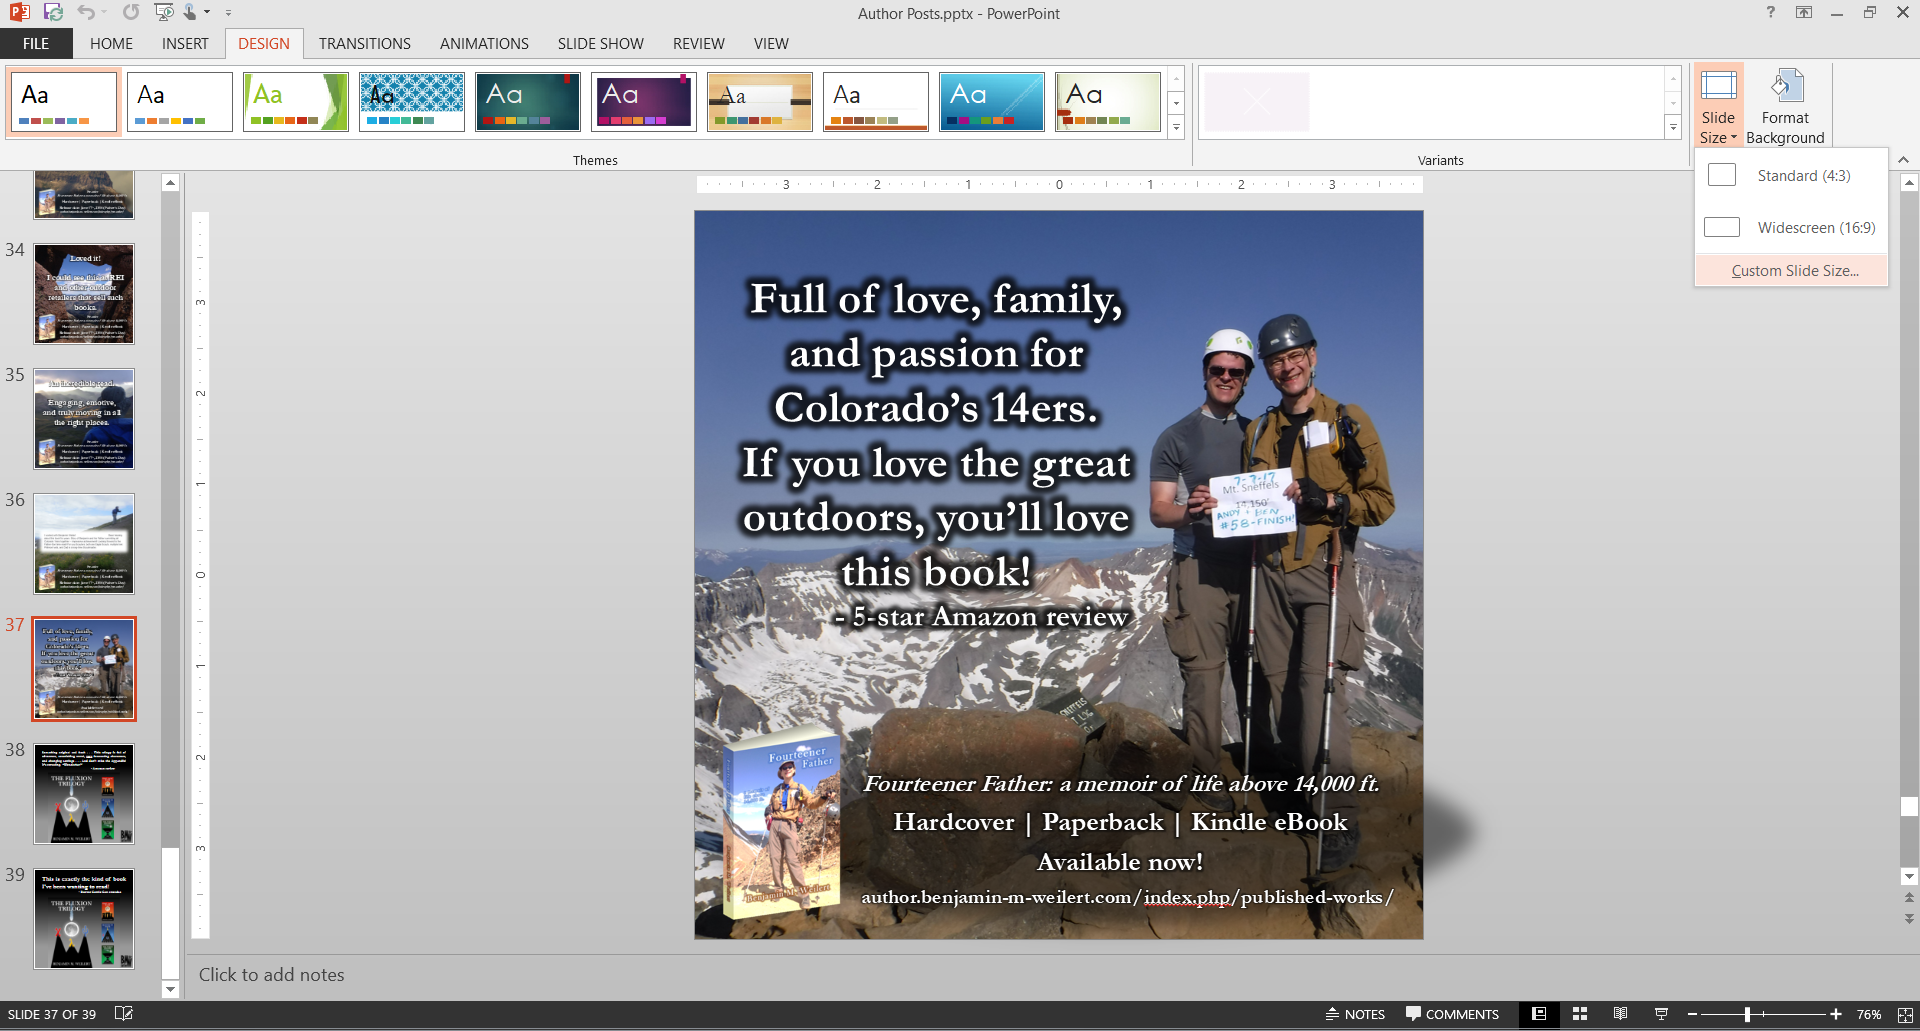
- Social media: In this digital age, social media is an essential facet of an author’s duties. Facebook, Twitter, Instagram, Pinterest, Tumbler, and more are required to gain a social media following. However, each of these platforms has slightly different image requirements. Cover photos for Facebook and profile banners for Twitter are slightly different sizes. Pinterest favors long vertical posts. Instagram is designed for square pictures. Fortunately, PowerPoint can adjust the slide size to fit whatever you need. Just go to the “Design” tab and click the “Customize” drop-down. From there, choose “Slide Size” and “Custom Slide Size…” From the pop-up box, you can adjust the width and height of your slide to meet your needs. You can even go to the “View” tab, select “Slide Master” in the “Master Views” section, and add your logo or watermark to every slide that you create. Then, all you have to do is fill each slide with the social media content you want, and you’ll be ensured that it’ll be the right size for the platform. One key thing I forgot to mention here is the crux of the whole PowerPoint benefit—you can save PowerPoint slides as image files. That’s right! JPEGs and PNGs are just a few of the many formats PowerPoint files can be saved as.
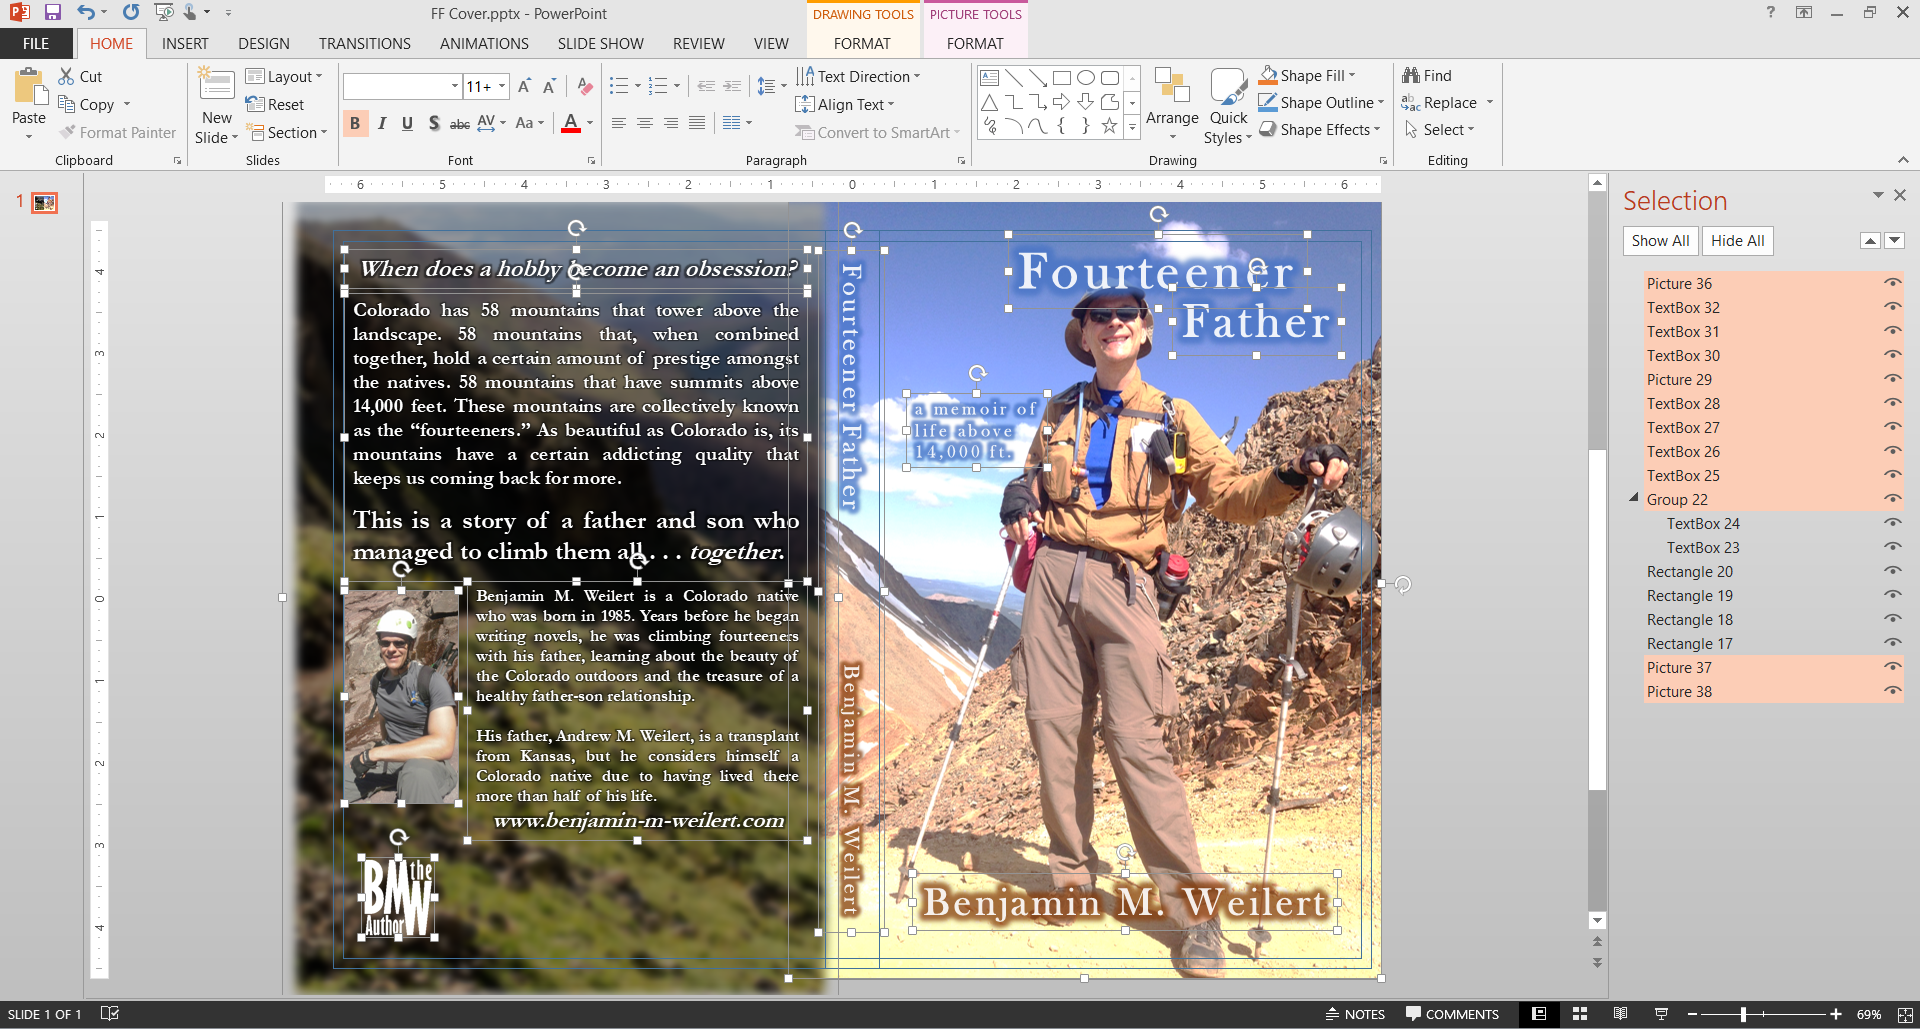
- Cover: Most people will use Adobe Photoshop to create the covers for their books, but PowerPoint uses the same “layers” concept that Photoshop does. I have an elementary knowledge of how to use Photoshop, but I find the addition of (and arrangement of) text boxes, shapes, and pictures is a lot easier in PowerPoint. Under the “Home” tab, the “Drawing” section allows you to draw boxes that can identify the trim and safe limits of your cover, align text so it remains centered on the cover, and group together whole sections of objects so they can easily be moved or copied elsewhere. You can even use some of PowerPoint’s “effects” on shapes, pictures, and text. Effects like shadow, reflection, glow, soft edges, bevel and 3-D Rotation can add just a little more pop to the cover. Under the “Arrange” drop-down, you can even select “Selection Pane” to see all the objects you have in the PowerPoint slide—hiding and moving them toward the front or back of the slide in one easy panel. Because you can adjust the slide size in PowerPoint (like I mentioned above), you can modify the slide size to be the exact size of your cover! One thing you’ll have to make sure you do before you save your cover, though, is change the resolution of the exported images. Printable images must be at least 300 dots per square inch (dpi), but PowerPoint’s default is much lower than this. To increase the dpi for exported images, you’ll have to make a simple change in your computer’s registry (instructions for how to do this are located on Microsoft’s support site). There are still limitations to this 300dpi change, so you’ll have to play with the size of your PowerPoint slides to ensure they’re still being exported at the highest resolution.
At this point, you should have a loose understanding of a few options and tools available through the three most-common Microsoft Office programs that can help you with your book-publishing goals. Sure, there are still limitations to these programs—they’re not as powerful or expensive as the ones tailored for writing—but there are also plenty of hidden gems that you can only find if you play around with them a little bit. I’ve discovered most of these tips and tricks over the years by wondering “what if,” then seeing if I could create it in Microsoft Word, Excel, or PowerPoint.
Necessity is the mother of invention, and if you don’t have enough money for the expensive programs, why not see if the Microsoft Office suite can meet your needs?
DISCLAIMER: Throughout this three-part post about Microsoft Office, I have been touting the benefits of these programs. I have not been paid by Microsoft to endorse their programs; I merely feel—through my own experiences—that they’re the most easily accessible programs that writers often ignore in favor of more expensive ones.