
Many months ago, I described the amount of work a writer would need to do by themselves to publish a book. Not only is there research, formatting, and graphic design involved, the writer also has to write said book. This whole process can be daunting, especially in the digital age. We have so many different programs at our fingertips to help us plan, write, and publish. A lot of these programs can cost a significant amount of money. Sure, programs like Aeon Timeline, Evernote, and Scrivener might be worth the money in the long run, but you’ll inevitably have to learn how to use these programs, which can eat into your writing time.
What if I were to tell you that there’s a suite of programs you probably already have installed on your computer that can accomplish many of the same functions as the programs that cost a lot more? Many of you probably already use these programs on a regular basis, so there are only a few minor tweaks you’d need to make to use their full power. Even if you don’t own these programs, you might be able to get them for cheap via your work or school. There are even trial versions you can download for 30 days if you’re working under a time crunch.
By now, you’re probably asking, “What are these glorious programs?” Two words: Microsoft Office. The most-used triad of this commonly-available set of programs are Microsoft Word, Microsoft Excel, and Microsoft PowerPoint. With these three programs, you can plan, write, and publish your book in a way that’s still as professional as the authors who publish traditionally. Granted, you’ll have to put in some work to ensure your book looks just as good as the ones released by major publishers, but these three programs make it doable.
Let’s go over some of the tips and tricks for how to use these programs to their utmost capability:
MICROSOFT WORD
When you opened this blog post, you probably didn’t expect to see Microsoft Word as an “unexpected program” for publishing your book. While you can do outlines and other research/planning/writing in any word processor, the real power of Microsoft Word comes during the polishing stages of your book. I will also mention that the .doc and .docx formats are commonly accepted by such self-publishing resources as CreateSpace and Kindle Direct Publishing (KDP), making it almost a requirement to own a copy of Word if you want to self-publish.
There are numerous tools at your disposal in Microsoft Word, but the following three are perhaps the most useful . . .
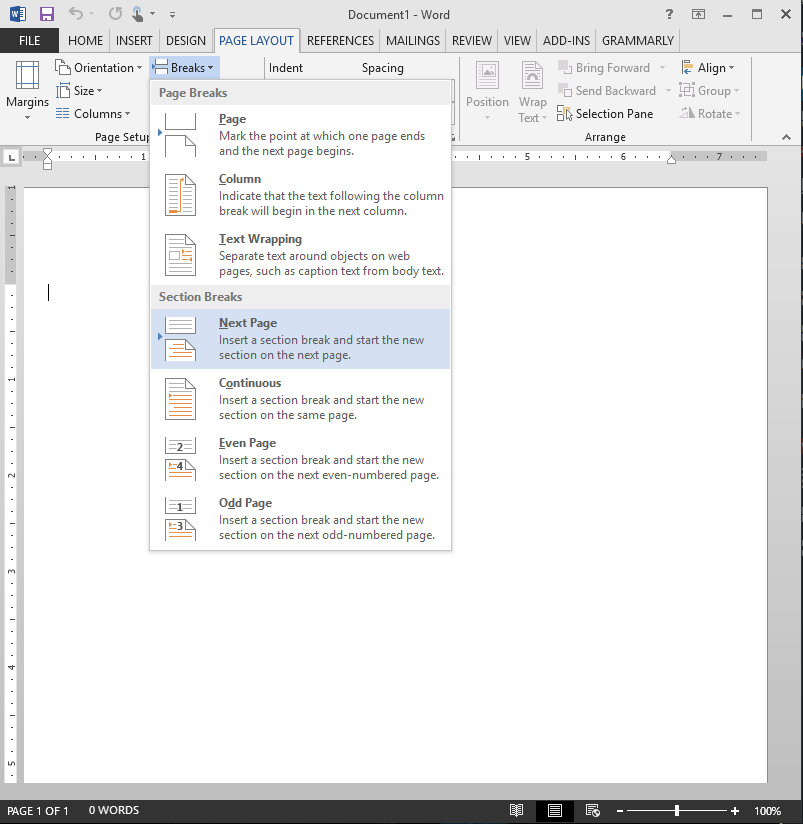
- Section Breaks: Have you ever wondered how some authors are able to put the chapter title in the header? The simple answer is “Section Breaks.” This tool is under the “Layout” tab and found in the “Page Setup” section under “Breaks.” When you reach the end of a chapter, add a “Next Page” section break to let your Word document know you’ve moved on to the next chapter. You can then go into the headers and footers and tell them to match the previous section or to be unique to the new section. Most books will have the headers of one of the pages contain the author’s name, while the other header can display the title of the book. These require matching to the previous section, but you can break the synchronization to make each section/chapter easier to find when flipping through your book. Just make sure to check each section before publishing to ensure the formatting for each of the sections does what you want it to.
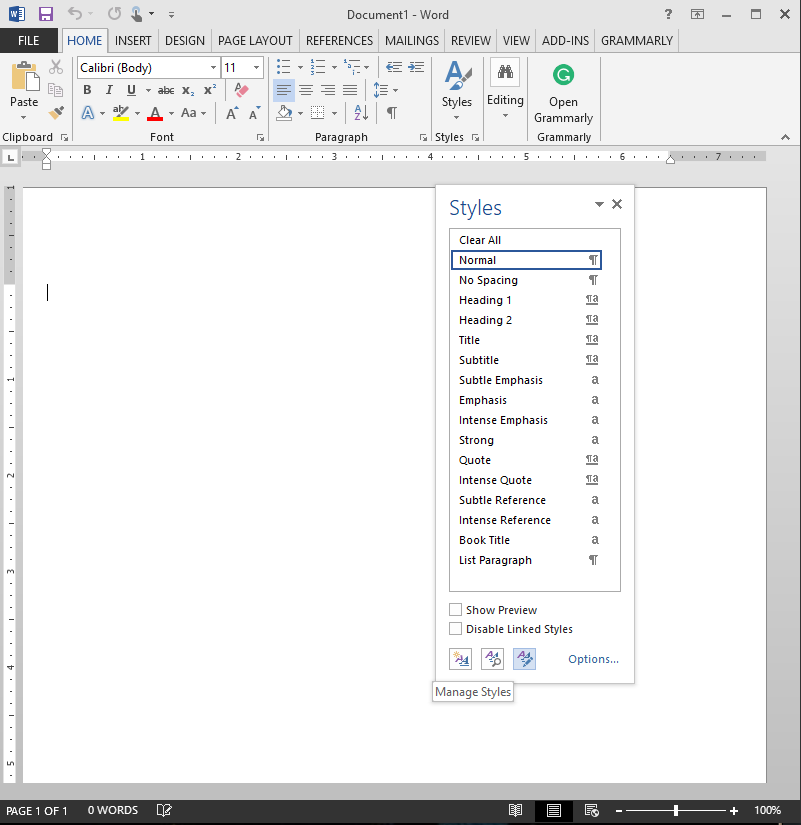
- Styles: Let’s say you want to have the main body of your writing as 12-point Garamond with 1.0 line spacing, indented on the first line and in the justify-align format, but you want the first paragraph of a chapter to be the same as the body text, but without the first-line indent. Well, you’re in luck, because you can set up “Styles” to automatically make these changes for you when you apply them to your paragraphs. Underneath the “Home” tab, there’s a section for “Styles” that is criminally underused. If you have a particular set of formatting that you want to repeat over and over again (like chapter headings or paragraph settings), then all you need to do is save these formats as styles and apply as needed. Clicking on the arrow on the bottom right of the Styles section will open up the different options for styles, along with the ability to create new styles and modify existing ones. You can be creative with this, even to the point of creating a style for a particular character’s dialogue, which you can then easily apply each time it occurs in the book. Basically, “Styles” are paintbrushes for how you want your text to appear.
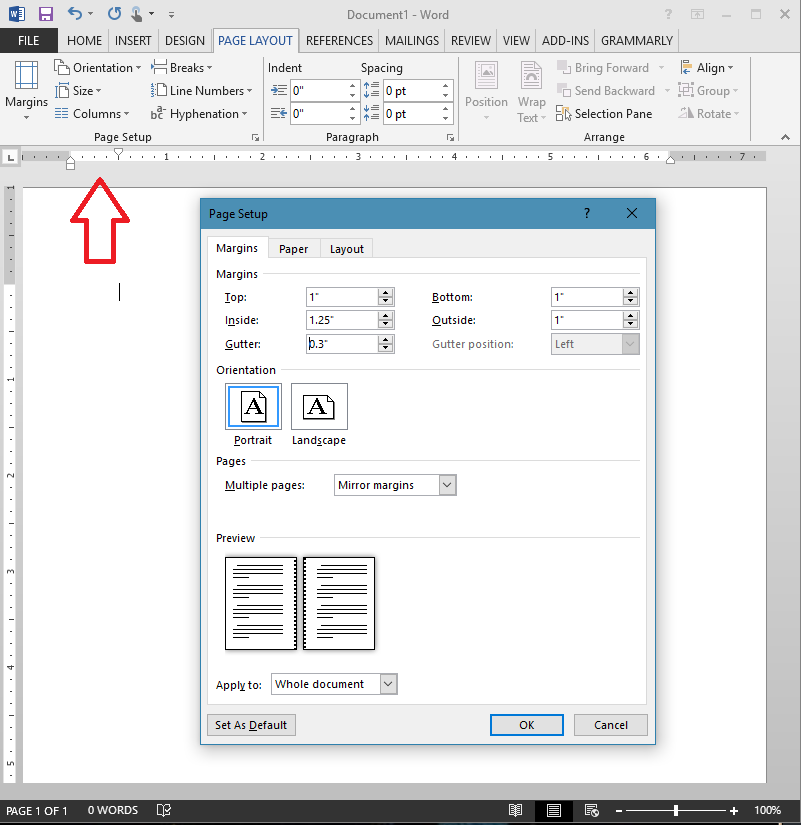
- Formatting: While Section Breaks and Styles can—and should—fit underneath this category, it’s one I find can often be neglected when self-publishing a book. Formatting is the one thing that sticks out in a published work, especially if it’s done incorrectly. If you’re unsure of how you want your book to look, pick out one of your favorite, famous authors and see how the interior text is formatted and try to imitate it. Common errors I’ve found are not indenting first lines of paragraphs, keeping paragraphs in right-align format instead of justify-align, and having text too close to the gutter (the area where the pages come together). Word has settings to fix all of these things. From the ruler at the top of the page to the “Margins” section of Page Setup, these types of formatting are usually pretty easy to find and manipulate. Basically, if you’re using the “default” settings of Word, people will notice. Take a little time to familiarize yourself with the formatting options of Word or—at the very least—download a template from CreateSpace to have a starting point.
There are plenty more capabilities present in Microsoft Word, but I think these three help the most in efficiently polishing a manuscript into something that looks professional. Just make sure you save a copy of your work before you start making any changes that are too drastic. After all, Word is a powerful program, but it can often reach its limits (or your limits of controlling it).
Next month, we’ll go over how to use Microsoft Excel to aid your planning and research.